AMIG 500 PR PLUS – Troubleshooting, Care and Maintenance

7. TROUBLE SHOOTING

Warning! An electric shock can be fatal. Before doing any work on the machine:

Switch it off and unplug it from the mains.

Put up a clearly legible and easy-to-understand warning sign to stop anybody inadvertently switching it on again.

Check to make sure the electrically charged components (e.g.capacitors) have been discharged.

Bolts in machine case also work for ground connection. Never use other bolt that can not work for ground connection.

Error code display

This series of machines have automatic protection and error code display function. Relevant Cause & Remedy can be found according to below Error codes, as shown in Table5-1.

Code Trouble Cause Remedy
E0A Water shortage protection
  1. Not enough or no circulating water in water-cooling system
  2. Water flow switch or signal line are faulty
  1. No or not enough cooling water
  2. Water hose is blocked or not connected
  3. Water circulation of torch is blocked
  4. Water-cooling motor is faulty
  5. Check water flow switch or signal line
  6. Replace control board
  7. Adjust sub-menu parameter P10 to OFF
E10 No current output protection
  1. No current output after power on
  2. Circuit failure (short circuit in control cable, signal line, or main board)
  1. Stop welding machine
  2. Check and fix circuit failure
E15 Abnormal on power up The start signal is ON when welding machine powers on Turn off the machine, check the start signal
E17 Over-current protection
  1. Over-current
  2. Current sensor fault
  3. Signal line is broken
  4. Main control board is damaged
  1. Check and repair output cable
  2. Troubleshoot signal line failure
  3. Replace current sensor
  4. Replace main control board
E18 Voltage feedback is unusual – Circuit failure
– Voltage feedback signal line disconnected
– Wire feeder welding cable disconnected
– Wire feeder control cable disconnected
– Welding cable not connected
– Welder main control board failure
  1. Check voltage feedback wire
  2. Check wire feeder cable
  3. Check welding cable
  4. Replace main control board
E19 Over-heat protection 1. Environmental:
  • Ambient temperature over 40°C
  • Air inlet too close to wall or blocked
  • Dust buildup on radiator
2. Usage:
  • Exceeds rated load
  • Welding specs beyond output range
3. Circuit failure:
  • Fan or relay failure
  • Broken signal line
  • Temperature relay or main board failure
  1. Check environmental conditions
  2. Check usage load
  3. Inspect fan, relays, signal lines
E40 Communication between display and main board abnormal
  1. Communication cables loose or broken
  2. Main control board damaged
  3. Display board damaged
Please contact supplier
E42 Communication between welding machine and wire feeder is abnormal
  1. Control cable of wire feeder unplugged or broken
  2. Communication cables loose or broken
  3. Wire feeder control board damaged
  4. Control circuit of welder faulty
  5. Setup issues (e.g., baud rate or address error)
Please contact supplier
E84 Communication fault between controller and robot cabinet
  • No 24V on DEV bus
  • Termination resistor not connected
  • Poor contact/open/short in bus cable
  • Main board of communication controller faulty
  • Communication controller cable poor contact
  1. Check connections
  2. Contact supplier
E85 Communication fault between controller and welding machine
  • Wire feeder control board failure
  • Main control board of welder faulty
  • Poor contact/open/short in communication cable
Check and replace components — contact supplier
Important! If any error message that is not described here appears on the displays, then the fault is one that can only be put right by a service technical. Make a note of the error message shown in the display, and the serial number and configuration of the power source, and get in touch with our after-sale service, giving them a detailed description of the error.
Power source trouble shooting
Note! The flowing troubles and causes are uncertain. However, duringthe process of MIG Pulse and the normal using conditions, that mighthappen
Trouble Remedy
Power source cannot work
  • Check the mains supply lead; ensure the mains plug is connected
  • Check if the air switch is turned on
  • Inspect the fuse and circuit breaker
  • Verify that the junction cable and connectors between power source and wire feeder are securely fixed
  • Ensure the ground cable is connected properly
Automatic tripping of main circuit breakers
  • Input cable short circuit
  • IGBT module damaged
  • Three-phase rectifier module damaged
  • Varistor damaged
  • Main circuit breaker damaged
Unstable welding performance
  • Check whether wire feeder operates correctly
  • Ensure wire feed rollers are properly installed
  • Adjust the braking force of the wire spool
  • Inspect and clean or replace welding torch guide tube if blocked
  • Check the size and material compatibility of the filler metal
  • Verify the guide tube is suitable
  • Inspect tip size, type, and wear
  • Check if the welding torch is overheating
  • Verify all cables and ground cable are securely connected
  • Confirm the welding parameters are set correctly
No output after start-stop signal is given
  • Start-stop signal wiring error
  • Wire feeder control cable damaged or poorly connected
  • Main control board damaged
Welding parameters are not adjustable
  • Wire feeder control cable damaged or poorly connected
  • Control panel components damaged
  • Control panel circuit board damaged
  • Main control board damaged
  • Current sensor damaged
  • Voltage feedback line disconnected
Panel is not showing
  • Power transformer damaged
  • Digital display or display board damaged
Fan is not working
  • Fan is damaged
  • Solid state relay for fan control is faulty
  • Main control board is damaged
Gas protection is not normal
  • Incorrect gas flow setting
  • Insufficient gas remaining
  • Gas leakage in hose
  • Gas regulator malfunction
  • Solenoid valve damaged
  • Wire feeder control cable damaged or poorly connected
  • CO₂ gas regulator not heating
  • CO₂ regulator is faulty
  • Heating cable is shorted or broken
  • Heating power thermistor faulty
  • Main control board is damaged

8 CARE AND MAINTENANCE

Before open the machine

Warning! An electric shock can be fatal. Before doing any work on the machine:

Switch it off and unplug it from the mains.

Put up a clearly legible and easy-to-understand warning sign to stop anybody inadvertently switching it on again.

Check to make sure the electrically charged components (e.g.capacitors) have been discharged.

Bolts in machine case also work for ground connection. Never use other bolt that cannot work for ground connection.

Maintenance

Please follow the instructions as below to ensure normal lifespan of power source.

  • Conduct safety check at regular intervals (see “Safety rules”)
  • Dismantle machine side panels and clean machine inside with clean and low-pressure compressed air by professional technician, not less than twice per year. Clean the components at a certain distance only;
  • If a lot of dust has accumulated, clean the cooling-air ducts.
Maintenance of water-cooled welding torch

For water-cooled welding torch:

  • Check the connections of water cooling system
  • Check the coolant level and cleanliness(clean coolant only)
  • Frequently check coolant’s back flow state


Daily maintenance

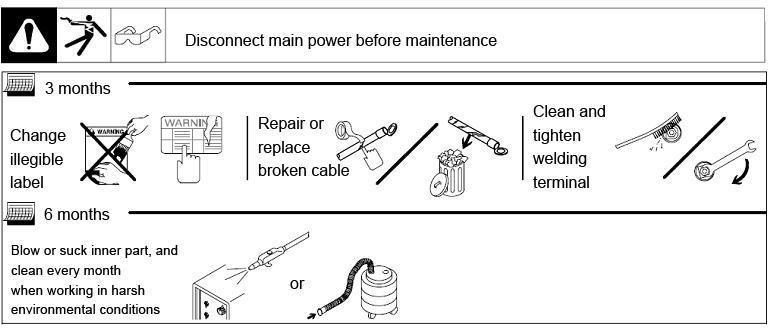
Fig. 8-1 Daily maintenance


Comments Box SVG iconsUsed for the like, share, comment, and reaction icons
Cover for Shaanxi Jingtai Cooperation Laser technology Co.,Ltd
Shaanxi Jingtai Cooperation Laser technology Co.,Ltd

Shaanxi Jingtai Cooperation Laser technology Co.,Ltd

857,114 Likes

Intelligent robot workstations, intelligent work islands, providing the entire process (cutting, assembly, welding, grinding, inspection, etc.) of intelligent applications for the non-standard metal structure manufacturing industry.

Fans and friends brought components from their factory to our company for inspection and trial welding.

No programming was required.

We could choose any one and place it on our welding workbench.

We only accelerated the unedited content of the following test.

We can see the impact of robot vision on this component.

It scanned the welding seams of the outer and inner circles and uploaded the program to the robot.

Then the welding started.

From moving into position to starting the arc, it took about one minute.

The robot continuously welded all the seams on the outer and inner circles.

This is the welded result.

Later, the customer requested to test multi-layer and multi-pass welding.

Compare this welding process with the 600 welders in your factory who work every day.

Which welding looks better?
See MoreSee Less

2 days ago

💡 Jensen Huang says China is pulling ahead in the AI race for three compelling reasons. This technological edge is translating directly into industrial innovation, as seen in advanced solutions like dual-robot welding workstations that are redefining efficiency and precision in manufacturing. A clear sign of what's to c#FutureOfManufacturingu#AILeadershipr#industrialautomationation See MoreSee Less

3 days ago

Facing the diversified construction conditions of the power tower industry, our intelligent robotic welding system delivers stable, beautiful weld seams while redefining the production process.

Simply place the components — no model import required.

With advanced visual imaging and reverse modeling, the system automatically performs path planning for fully automated welding. Robots operate autonomously along the ground track, completing the entire process from the first weld to the last without human intervention.

After finishing one side, the system automatically turns the component and continues welding on the other side.

One operator can manage multiple intelligent welding lines at the same time.

This solution significantly reduces reliance on highly skilled welders, transforming production efficiency and product quality from difficult-to-control variables into predictable, stable, and manageable outputs.

#roboticwelding #industrialautomation #SmartManufacturing #powertower #WeldingTechnology
See MoreSee Less

3 days ago
Load more

Latest News

Contact Details

Subscribe Us

Join our newsletter; you will receive our newest videos/tips of our laser marking, cutting, welding, cleaning and cladding machine’s latest prices and the latest promotional news


You will also get our monthly report of best products, and also coupons.

Inquire Now

Feel free to inquire now. We are always here to help you.

¡Consulta ahora!

Siéntase libre de hacer su consulta ahora. Siempre estamos aquí para ayudarlo.

استفسر الآن

لا تتردد في الاستفسار الآن. نحن دائمًا هنا لمساعدتك.

Связаться сейчас

Не стесняйтесь задавать вопросы. Мы всегда готовы помочь вам.